
Amy Purdy’s Quarantine Curl Guide
 Introduction:
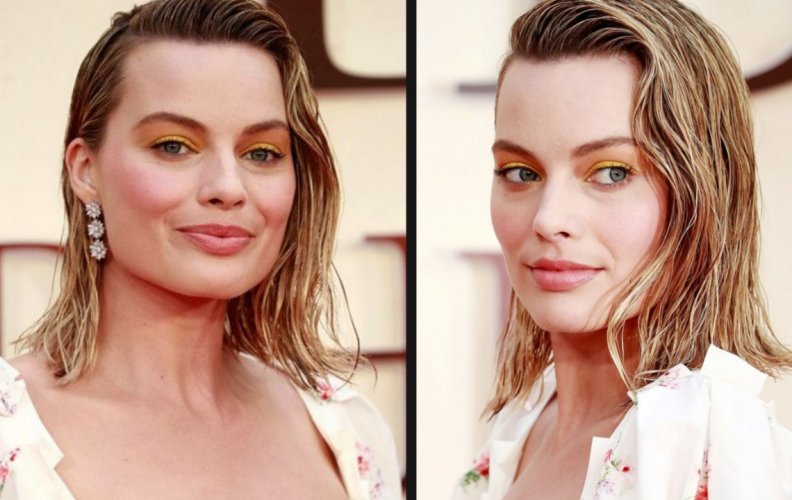
Amy Purdy grew up with a passion for snowboarding and dreamed of traveling the world. Despite obstacles that should have stopped her in her tracks when she lost both of her legs at the age of 19, her passion carried her to winning a bronze medal in snowboard in Sochi and beyond. Amy is a New York Times best-selling author, runner-up on Dancing with the Stars, an international motivational speaker who has toured alongside Oprah Winfrey, was featured in a Super Bowl commercial—and the list goes on. Today, Amy shows us how to get her gorgeous Quarantine Curls.
Here is Amy Purdy’s QUARANTINE CURL Guide:
Like many of us during this crazy time of quarantine, I have found myself doing things I never would have done before! One of those things is deciding to set aside all heat tools and allow my hair to just do its natural thing! Why spend the time on our hair and why damage it when we don’t have to! If there was ever a time to go natural it’s now! What I found by trying this technique is that my hair had a lot more wave & curl than I ever knew! So, of course, I had to share this technique with all of you!
After years of blow-drying and curling my hair and after years of ice-cold temperatures while snowboarding plus all the TV productions and interviews I have done my hair was seriously dry & damaged. Not only that but for years I was in the habit of doing it a certain way and thought that was the way I had to do it in order for it to look good! Basically, I knew how I wanted to do my hair but I really had no idea what “it” wanted to do. Not only that but every time I let it go natural after I got out of the shower it would go frizzy and completely crazy. I simply believed it was too wild to really let it go natural but what I learned after trying this method was that I simply wasn’t doing it right!
“Quarantine Curls” came to be after a late night when I should have been sleeping! I decided to look online for ways to get wavy hair without frizz and what I found was a million different techniques to support your wave and curls. I ended up watching a youtube video on a modified version of ‘The Curly Girl Method” and decided to try it! I didn’t follow it exactly because I didn’t have the exact products so I just used what I had! I also learned there is a book on the method on Amazon which I haven’t bought yet but it includes a proven method to find your curl and waves in your hair. So if you are interested in going curly long term and actually learning more about your hair and how to support your types of waves, that book is the place to go!
For me, it was the middle of the night plus we are under quarantine so all I used is what I had in my house!
I followed a few different methods that I found online and let my hair dry naturally. When I looked in the mirror I was shocked and surprised to see how wonderfully curly, separated, and bouncy my hair was! I had no idea my hair was curly! Wavy yes, but curly?! It wasn’t just curly but it had zero frizz, it was shiny and I learned for the first time that I had a lot more curl in my hair than I ever knew!
I snapped a photo of my new found curls and posted it on Instagram and I was so surprised how many of you wanted to go natural and learn this technique as well! In fact, I have loved all of the photos you have tagged me on!
Now, I must share that I am no expert and I’m learning as I’m going but I’m excited to share what I have learned and what’s working for me!
So here we go! Below is the method I’m using plus a few answers to the many questions I have received! Once you try this if you post a photo please tag me on Instagram @amypurdygurl I want to see and hear if it’s working for you!
Quarantine Curls
PRODUCTS
- Silicone-free & sulfate-free conditioner ( I am using Rudy’s Barbershop Conditioner) however I’m always trying new things! The ide right now is to use what you have at home as long as it’s sulfate and silicone-free!
- Gel or curl cream (Gel will lock in moisture more and give more defined curls I’m using Garnier Pure Clean Gel )
- Wide-tooth comb
- Paper towel, an old t-shirt, or a t-shirt towel.
STEP 1: WASH – Wash hair with conditioner, not shampoo. You read that right! No Shampoo! I’ll explain why in a minute! Cleanse your hair in the shower like you would with shampoo except use conditioner. Make sure to get in the roots and scrub your scalp as you would shampoo. Then rinse out fully.
Why this works – To be honest, I don’t know the exact science and won’t claim to but I do know that shampoo strips the natural oils from your hair which leads to your hair drying out and frizzing plus if you have naturally wavy or curly hair you actually need moisture to define your curls! Now that I have gone without shampoo for 3 weeks my hair is wavier and has less frizz than ever! Everyone’s hair is different but this is a key step to getting those healthy separated waves we are going for!
STEP 2: CONDITION – Condition your hair with the same conditioner. Let your conditioner sit for a few minutes like normal and either finger comb to get the tangles out or use a white tooth comb.
TIP- If you have very dry or porous hair you can leave in a small amount of conditioner however if your hair is straight, fine, or thin then it can get greasy if you leave the conditioner in.
STEP 3: RINSE– Flip your head upside down then rinse the conditioner out. Make sure you are rinsing all the conditioner out with your head upside down. Finger comb or use the wide-tooth comb to get all the tangles out before rinsing. Your hair should separate naturally.
STEP 4: SQUEEZE– With your head upside down squeeze some of the water out.
STEP 5: SCRUNCH– Here is a key part! While hair is still wet ( before you dry it) and while your head is still upside down in the shower you add your gel or cream. Comb it through or gently use your fingers to make sure your gel is distributed throughout your hair. Now start scrunching!
What you don’t want – Don’t finger-comb so much that your hair is scraggly.
What you do want – You want your hair nicely separated, try nit to disrupt the waves forming after the conditioning process.
TIP- By adding the gel while your hair is still quite wet it actually works with the water to lock in moisture and reduce frizz. This is why we are adding gel before we dry!
GEL– I find gel gives more defined curls and if you use a light gel then it won’t dry with a crunch at all
CREAM– When I used a nourishing curl cream my hair curled really nice but I found the curls to not separate as much as they did with the gel.
STEP 6- Grab an old t-shirt or a paper towel and scrunch! This will get the excess water out and will continue to let your hair curl. It may take some product out but not all of it. If you feel it’s taking too much product out then you can add gel or cream but you don’t want to break up the natural waves that are forming.
Gently stand up and keep scrunching and move head from side to side to scrunch. The idea is to make sure you are scrunching all areas of your hair with no flat spots.
STEP 7: AIR DRY – Now you just let it dry and don’t touch it until it’s completely dry.
TIP- If you want to dry faster you can use a blow dryer with a diffuser and scrunch while you are drying your hair upside down and side to side.
Once your hair is completely dry which may take a few hours depending how thick and long your hair is then you can shake it out and if needed scrunch out some of the crunch of the gel.
Conclusion
Basically what I have learned is this method allows your hair to fall in its natural wave pattern without disrupting it. You may have to experiment and try different brands of products to see what works best. For example, I tried one brand of conditioner and ended up with some frizz but I tried another and had nice separated curls!
QUICK GUIDE
Step 1 – Cleanse with conditioner
Step 2 – Condition ( get tangles out)
Step 3 – Rinse upside down and lightly finger-comb
Step 4 – Squeeze water out
Step 5 – Add gel or cream and scrunch
Step 6 – Dry – Scrunch with an old t-shirt or paper towel.
Step 7 – Air dry
Step 8 – Scrunch or finger comb to break the curls up
Q and A
After I posted this technique the very first time I got a lot of questions. In fact, I got too many questions to answer properly on social! So, here are answers to some of my followers’ questions.
Q – No Shampoo?? Won’t my hair be greasy and dirty?
A- Surprisingly no! From what I have learned, conditioners can pull out dirt and grease when you treat it like shampoo yet it won’t strip like shampoo and I have read that some types of hair never need shampoo again.
Q- So you never shampoo again?
A- Well, I have gone about 3 weeks without shampoo and haven’t needed it. However, from what I have learned is if you totally commit to this long term you can shampoo once a month to make sure you are getting out any build-up!
Q- Can I use any kind of conditioner?
A- Just make sure it’s silicone and sulfate-free. This is part of why you don’t get excessive build-up. If your conditioner has silicone in it then you will get buildup over time. So check the bottle and make sure that it says “Silicone and sulfate-free”
Q- My hair is a greasy mess. What did I do wrong?
A- Did you wash all the conditioner out? Or Did you put too much curl cream in? It’s worth playing around with.
Q- My hair goes curly but flat at the roots –
A- My hair was doing that too then I started using bobby pins to pin the roots up while it dries. Another option is to use a diffuser and blow dry just the roots for height. I also had a follower recommend something called curl clips but I haven’t tried them yet.
Q- Why use a paper towel or T- shirt towel?
A- Normal terry cloth towels create frizz. These materials help to limit frizz.
Q- My hair was crazy the next morning now what?
A- I get it! My hair is always crazy in the morning and like I said I’m no expert here but I’m learning as I go! Normally what I do in the morning to “refresh” my hair is use my fingers to wet down my hair. I wet it quite a bit but not as much as I would in the shower. I just get it wet with my hands especially the hairs with weird kinky areas and I let it air dry. What it does is make my hair less curly and wavier which I like. There is a way to “ refresh” your curls if you want your hair to stay really curly by wetting it down with your hands and adding a bit more gel and then scrunching again. It’s a bit of an experiment until you find what works for you. I will be sending out an email about how I refresh my curls with photos and a video soon!
Q- So, no heat at all? Really? What if it takes too long to dry?
A- If you want to add a bit of heat you can use a blow dryer with a diffuser!
Q- Does this work for everyone?
A- Once again I’m not a professional hairdresser so I don’t have all the answers however people with thin, fine or stick straight hair have mentioned that it wasn’t working as well for them. In that case, you may need to use less product if you feel your hair is weighed down or greasy or you may need to stick to your normal shampoo however the idea is to try to not shampoo as often. If you tend to shampoo daily try to spread out your shampoos weekly or every other week. That’s if you feel you need to actually shampoo. The natural oils in your hair tend to help the waves separate better, that’s why this process doesn’t include shampoo!
Ok! I hope this method works for all of you like it has for me! It’s all an experiment and what better time to try something new than right now while we are all home with nowhere to go! Everyone’s hair is different so you may find a variation of this that works best for you!
I want to thank you for joining my Quarantine Curl Challenge! I am truly inspired by how many of you want to go natural with me right now! Make sure to tag me so I can see your curls!